Back to Asset Essentials Main Menu
Creating Inventory Transactions
Easily manage and track inventory levels from the palm of your hand using the Receive, Issue, and Transfer part transactions. To start any of the transactions the user can follow the below instructions.
-
Open Asset Essentials mobile application.
-
Tap the Parts icon at the bottom of the screen.
-
There are two ways to start a part transaction through the mobile app:
-
Filter or search for the part you are creating the transaction for. Swipe to the left on the part and tap Actions.
-
Or tap Scan Part to scan the barcode/QR code associated with the part.
-
-
Proceed to the respective section below.
![]()
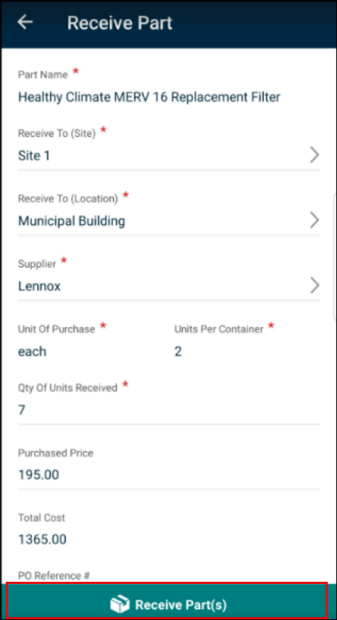
Receive Part Transactions
The receive part transaction allows you to add part quantities to your inventory from the Asset Essentials mobile app in place of using the purchase order functionality of the system. *Note: Do not create a receive part transaction to add parts to inventory if a PO was created for the parts already in Asset Essentials as this would create duplicate inventory items and incorrect on-hand quantities.
-
Tap Receive in the action menu.
-
On the Receive Part screen, some information may already be filled in for you:
-
If used the Swipe & Action workflow, the Site and Location will already be populated for you.
-
If the barcode/QR code is scanned for the part, select the appropriate Site and Location where you are receiving the parts.
-
If the accounts are only with one Site, that Site will automatically be selected.
-
If a Site is selected with only one Location, that Location will automatically be selected.
-
-
Select the Supplier of the part you are receiving. If the part lists only one Supplier option, that Supplier will be selected automatically.
-
Fill out the form including all required fields, such as Unit of Purchase and Qty of Units Received.
-
Enter any other applicable information, such as the Purchase Order Ref # or Invoice # if you are using a 3rd party system to record and track PO orders or invoices.
-
You can enter a cost center and notes for this transaction, if needed.
-
Tap Receive Part(s) to save the transaction.
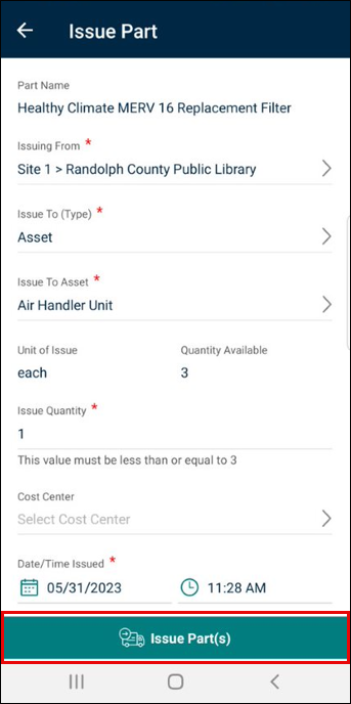
Issue Part Transaction
The issue part transaction allows users to record part usage to help track who and what are consuming parts.
-
Tap Issue in the action menu.
-
On the Issue Part screen, some information may already be filled in for you:
-
If used the Swipe & Action workflow, theIssuing From field will already be populated for you.
-
If the barcode/QR code is scanned for the part, select the appropriate location where you are issuing the parts.
-
If the accounts are only with one Inventory Location, that location will automatically be selected.
-
-
Select the Issue To (Type) to define if you are issuing the part to an asset, user, location, site, or work order.
-
Fill out the form including all required fields, such as Issue Quantity.
-
Depending on the Issue To (Type) selection, the Issue Part Form will add one to two required fields so the user can define the asset, user, location, site, or work order they are issuing to.
-
You can enter a cost center and note for this transaction, if needed.
-
Tap Issue Part(s) to save the transaction.
Transfer Part Transaction
The transfer part transaction allows users to track the movement of parts across sites or to other locations they manage.
-
Tap Transfer in the action menu.
-
On the Transfer Part screen, some information may already be filled in for you:
-
If used the Swipe & Action workflow, the Transfer From (Location) will already be populated for you.
-
If the barcode/QR code is scanned for the part, select the appropriate location where you are transferring the parts from.
-
-
Fill out the form including all required fields, such as the Transfer To (Location) and Transfer Quantity. *Note: The transfer quantity must be less than the Quantity Available.
-
You can enter a note for this transaction, if needed.
-
Tap Transfer Part(s) to save the transaction.
![]()
